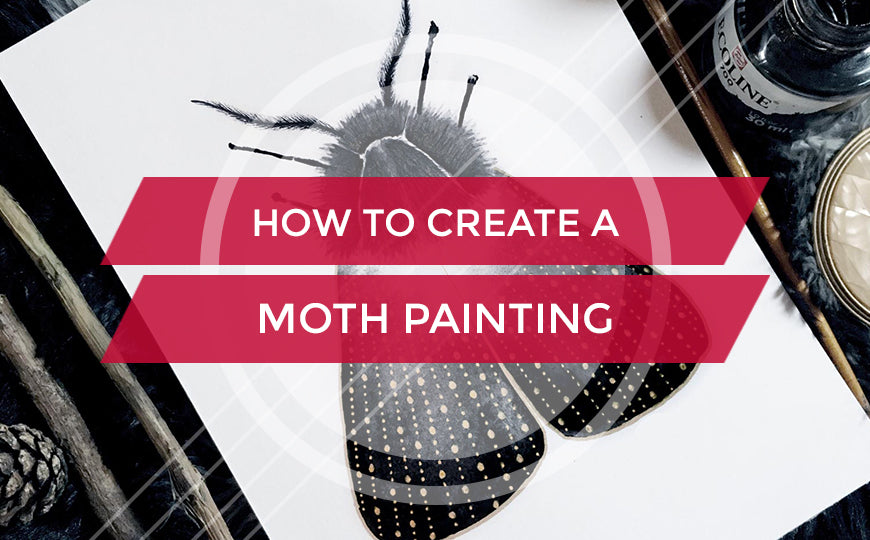
How to Create a Moth Using Pen and Ink
Hi everyone! We have Roxane of IG: @theflowdesign on the blog today to share her unique pen and ink artwork with us! If you want to re-create this beautiful moth painting, check out her step-by-step process below!
Take it away, Roxane!
----------
Hi! I'm Roxane, an illustrator from Paris, France. After working several years as a Graphic Designer, I reconnected one year ago with my first love: Illustration. I started my Instagram account @theflowdesign to have a place to share my process and connect with inspiring people around the world, which changed my life as I am now also working as an illustrator and just opened my Etsy shop! In THE pursuit of balance and flow in life, I have explored illustration as a way to reconnect with my true self, nature, and the magic of life and the universe.
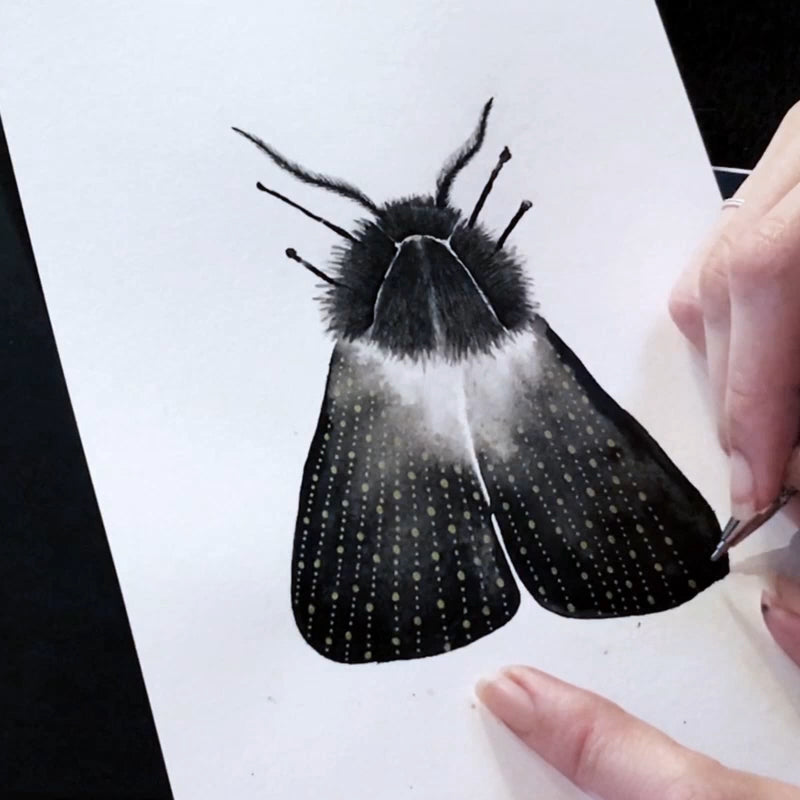
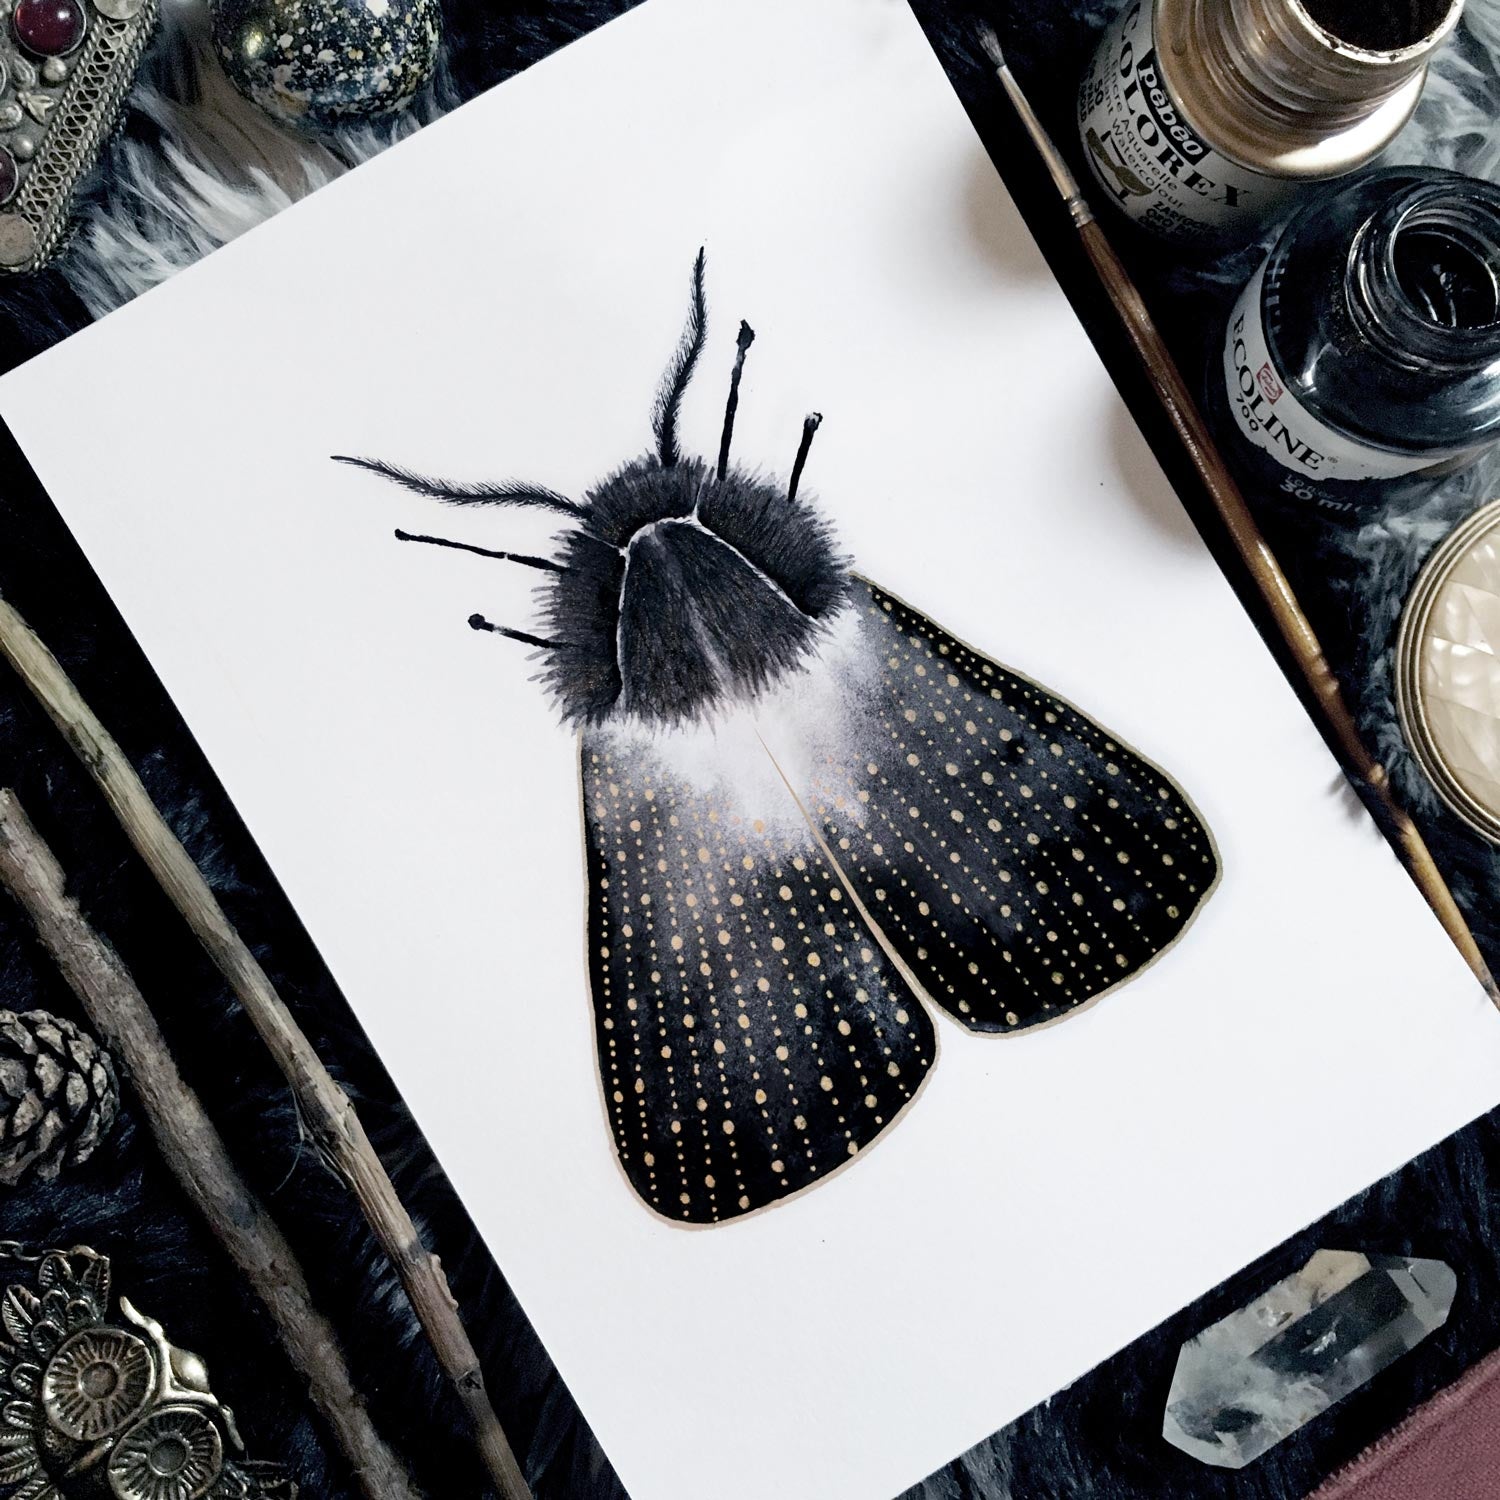
Black and gold is one of my favorite combo. I love the dark and slightly magical atmosphere it translates, and I thought I would share with you a tutorial on how I made a piece that is very dear to my heart: Noémie the Moth! This cute moth lived in my room for a while and inspired me a painting, so choose your own moth, follow the steps, and have fun!
CHECK OUT THE VIDEO BELOW:
MATERIALS:
INK:
- Indian Ink
- 1 glass/jar for water, of course filled with water
PAPER:
- Choose heavy paper than can sustain layers of water, such as watercolor paper. Here I used the Bulky acid free 250g/m² cold-pressed (textured) paper in A5 size by the brand Clairefontaine.
PENS:
- A pencil to sketch the basic shape of the moth
- Black pens (here: Pigma Micron 005 and 01 by Sakura)
- A gold pen (here: 1200 metallic 53 gold brush pen by Edding)
- A larger gold pen or brush (here: Pentel Slicci 08 gold pen by Pentel)
BRUSHES:
- 1 small brush for the fluffy fur and legs
- 1 big round brush for the wings
HOW TO CREATE A MOTH USING PEN AND INK:
STEP 1: Preparation
Choose a practical and comfy location, a place you feel good, and on a flat and hard surface, prepare all your art supplies. Typically, a desk will do, although I love being cozy and painting on my bed (I can't recommend it for your back's health though!).
STEP 2: Sketching
I always sketch my subject with a pencil to help me with composition, symmetry (when needed), and volume. I find it helpful to keep the big picture in mind as I go from one element (and one technique) to the other. I only draw the outline of it and keep it simple, no detail. I go lightly with the pencil as to not mark the paper. This way, the inks can cover it and I can easily erase it when the artwork is done.
Also, the choice of paper is super important, especially when working with liquid ink, watercolor, or paint. Here, I'm working with black ink but the same goes for watercolor: choose a heavy paper, minimum 180g/m² so it can sustain water layers. I also always use cold-pressed paper, which simply means textured, because I love the effect it gives the pieces. It also helps with blending!
STEP 3: Drawing and painting the small elements
First, we're gonna draw and paint the antennas and legs.
For the antennas, I used a black pen to draw the solid part and a finer black pen to draw the hairs. They look like tiny lashes and that's the part where we need to be delicate. In order to create this fine hair texture, I angle my pen and do quick strokes starting firm, but ending light in the air. Do a few tries on a scrap piece of paper to get the movement right and proceed. Angle your strokes to follow the main thick line the hair is attached to so it creates a natural movement.
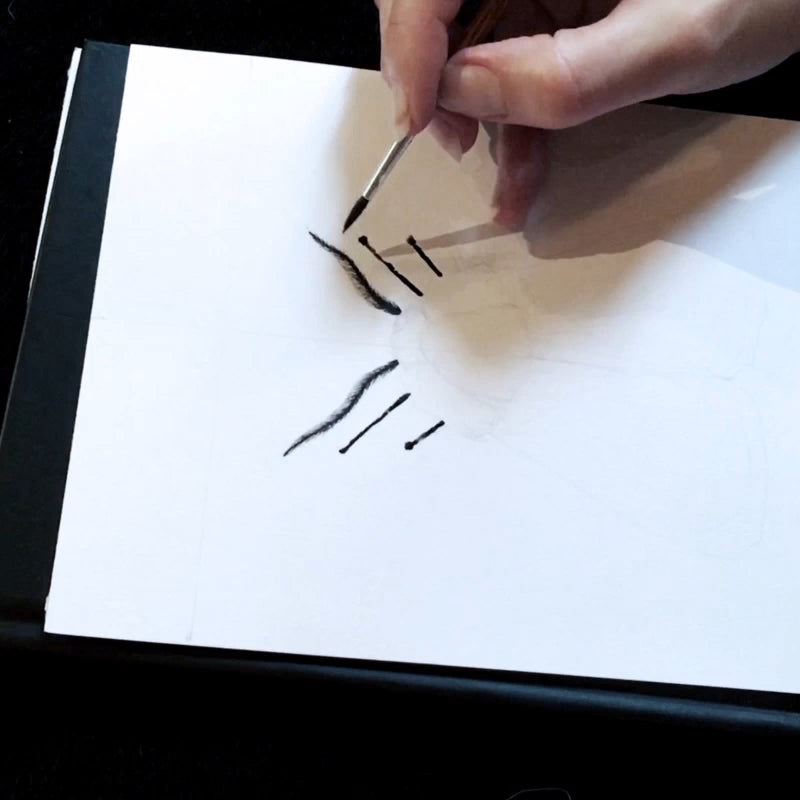
Now for the legs. Take a small detail brush, dry, dip the tip in black ink (no need to saturate the whole brush) and paint the legs with lines and dots. Here, we keep it very simple.
STEP 4: THE WINGS
Now, let's start one of the funnest part to me: the wings! It's time to play with water and ink flow!
Have your water container and ink ready. You can pour some ink in a palette, or if you don't have one, a jar lid or ceramic plate does perfect.
First, wet the first wing you're going to paint. Use the big round brush and saturate it with water, then apply on the wing. You don't want a slightly wet paper, you want it quite saturated and with a visible layer of water so that the ink can flow and create a beautiful, organic texture. So don't go lightly and apply as much layers of water as needed (2 or 3 for me, usually). Don't let it dry.
Now, don't wait — dry your brush a little on a piece of tissue or fabric and dip it in the black ink so that at least half of it is saturated with the ink.
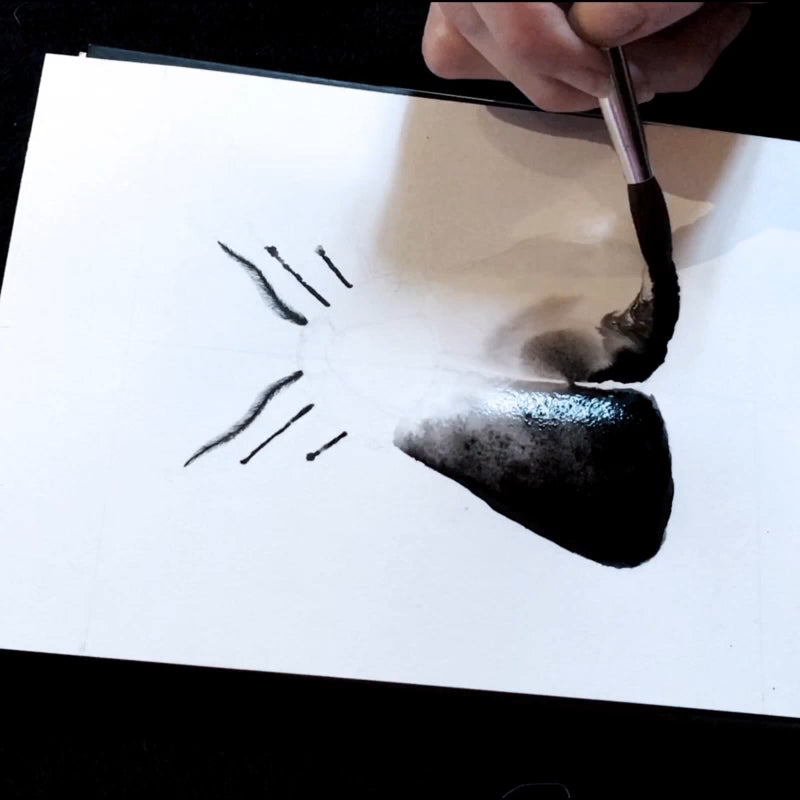
For these wings, we're doing a gradient from black to white (the paper), so we're applying the ink on the outer and bottom part of the wing first in one movement. Don't be shy, use good pressure on this edge so the brush can release the ink and it can flow on the whole wing in gradients.
A little tip: if ink splashes around a little like it did in my video, quickly grab a tissue and tap it, it will be like nothing happened, but be fast!
Now adjust the gradient by adding water in some areas, ink in others (where you want to deepen the dark), and use a folded tissue to absorb excessive water or ink and create the effect you want.
Let this wing dry and then repeat this process for the second wing.
STEP 5: Painting the fluffy head
Alright, that's the part where we will need patience and precision, but it's quite a meditative time too, don't worry!
For each of the four areas of the head, we will apply the same technique.
It's all about layers!
Start by lightly wetting the first area you'll be working on. Then take your small detail brush again (the one you used for the legs or even a smaller one), dip it in water, remove the excess on a tissue, then barely dip the tip in ink. We want a first layer of very light grey. If you're unsure, test the grey on a scrap piece of paper.
Apply the ink from the inside to the outside finishing with tiny strokes, we're making the bottom, light layer of hairs here. For this first layer, you only need to make hairs on the outer area. The inside is plain light grey.
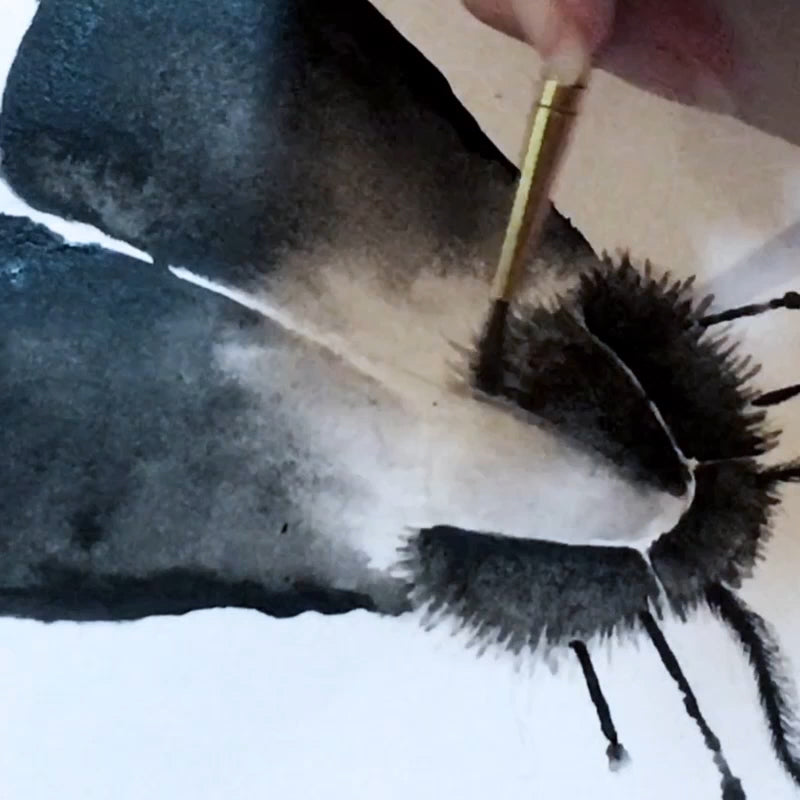
To get a natural hair texture, you want to use your brush as you used the pen with the antennas' hair: start the base of your hair more firmly than its end.
Now let this layer dry a little (not completely), charge your brush with a little water if needed, charge it with a bit more ink than before, and start the second layer.
Keep in mind that we're going darker to lighter from the inside out to be realistic. So apply the ink on the inside edge first and use this wash to go on the outer edge and form the hair.
Repeat this process several times until you're happy with the fur and fluffy effect! Repeat this whole process for all the head areas.
When everything is dry, you can use a very fine black ink pen to go over the fur and make tiny strokes to define the hairs even more.
But keep in mind that less is more!
STEP 6: The golden magic
Wait for your piece to be completely dry.
Now it's time to add some golden magic to Noémie the Moth!
Using a gold pen (mine is the Slicci 08 by Pentel), draw lines of dots. I like alternating 4 small dots with one big dot to create this lovely, pearly pattern.
Be careful to draw these dotted lines following the wings angles, stay focused for them to be straight and enjoy!
STEP 7: The final step
And for the final step: use a larger gold pen or pen brush if you have one (if you don't, use your same fine pen but apply several layers to widen the line), and contour the wings.
And Voila! You made a magical moth, step back, be proud and breathe ;)
CHECK OUT THE FINISHED PIECE BELOW:
I hope you enjoyed making it and following this tutorial, you can find me on Instagram @theflowdesign where I consistently post my processes!
Thank you for watching and reading!
----------
Have a question about this process? Comment below and we'll do our best to answer you!
To see more of Roxane's work, visit or contact her on the following channels: